



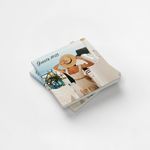



Square photo album in a compact format
Keep your memories forever with professional quality
This album combines balance and elegance, offering the best photographic printing technology. Produced with Fujifilm Crystal Archive DP II papers, globally recognised for their premium quality, it ensures vivid colours, sharpness and long-lasting durability. The Layflat binding allows it to open completely flat, making each page more immersive and enhancing your memories.
- 3 photo paper options: Glossy, Matte or Silk
- Customizable flexible cover
- Cover finish in matte, glossy or textured effect
- Layflat binding that opens completely flat
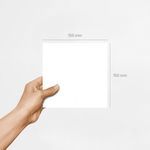
Photo Album 15 x 15 (Photo Books)
Share
Preserve unique memories in unforgettable pages
A photo album is more than an object: it is a guardian of memories. This model was created to turn special moments into pages that last forever. Whether to remember a trip, celebrate an achievement or highlight everyday life, each photograph finds its place here. The square format gives harmony to the images and makes them more expressive.
Durable paper quality and finishes
Produced with Fujifilm Crystal Archive DP II photo papers, this album ensures vivid colours, sharp details and long-term resistance. Silver halide technology provides excellence in photographic reproduction. The Layflat binding allows the album to open completely flat, without a central crease, while the 300 g/m² endpapers add strength and durability.
Personalise your Photo Album with the Ask-to-Print Online Editor
The Ask-to-Print Online Editor was designed so anyone can create a unique album easily and creatively. You can upload photos from your phone or computer, choose automatic or manual positioning, and add text and captions. The soft cover can be finished with matte, glossy or textured coating, making each album exclusive.
Buy your high-quality photobook now at Ask-to-Print
This album is a cheap choice that combines professional quality with an affordable price. It represents an economical option to keep memories without giving up elegance. It is also a low-cost service that offers visual impact and durability. Buy online now and turn your photographs into tangible memories that last forever.
Fujifilm Crystal Archive DP II Photo Paper
High-quality professional photo paper
Fujifilm Crystal Archive DP II photo papers are globally recognised for their premium quality, durability and professional finish. Designed with silver halide technology, they offer vibrant colours, sharp details and long-lasting resistance, making them the ideal choice for photo albums, large-format prints and prestigious projects. With Glossy, Matte and Silk finishes, they provide the perfect solution for every style and preference, always maintaining Fujifilm’s renowned excellence.
High Gloss Photo Paper
Photo Paper | Fujifilm Crystal Archive DP II Professional Glossy |
| Finish | High gloss |
| Weight | 250 g/m² |
| Thickness | 0.23 mm |
| Writing | Permanent marker |
| Fingerprints | Fingerprints may be visible |
| Production technology | Silver halide |
| Copy protection | — |
| FSC® certified | Yes |
Semi-Matte Photo Paper
Photo Paper | Fujifilm Crystal Archive DP II Professional Matte |
| Finish | Semi-matte |
| Weight | 234 g/m² |
| Thickness | 0.22 mm |
| Writing | Permanent marker |
| Fingerprints | Fingerprints barely visible |
| Production technology | Silver halide |
| Copy protection | — |
| FSC® certified | Yes |
Silk Satin Photo Paper
Photo Paper | Fujifilm Crystal Archive DP II Professional SilkFAQsPhotobookYou can choose between 20 x 20 cm, 30 x 20 cm, and 20 x 30 cm sizes, allowing you to tailor the photo book to your preferred style and the number of memories you want to include. Photobooks include between 16 and 80 pages. They are perfect for compiling the most important moments of the first year, from maternity to birthdays and everyday discoveries. The photo book offers four elegant cover options: synthetic leather, wood-look, cork, and linen. Each material adds a distinct and sophisticated touch to your album. You can choose between a traditional glued finish or the elegant layflat binding, which opens completely flat for seamless photo viewing — perfect for panoramic images. The photobook is printed on high-quality photo paper — Silk, Glossy or Matte — using professional printing technology with long-lasting inks. This ensures vibrant colours, sharp contrast, and resistance to fading over time. Yes! The online editor is intuitive and provides easy-to-use tools to arrange pages, select layouts, add text, and apply effects. You can drag and drop photos, adjust elements, and preview the final result in real time before placing your order. Absolutely. It’s a meaningful and personalised gift, perfect for baby showers, christenings, birthdays, weddings, or any kind of celebration. The quality of the materials and the design make it a lasting and special keepsake. Yes, you can apply effects such as sepia, black and white, vintage, or polaroid-style directly in the editor. These filters add an extra artistic and emotional touch to your images. Printing and ProductionTo ensure a professional result when printing your graphic project, it's essential to follow a series of best practices. The file must be created from scratch using the correct format and dimensions, respecting the technical areas defined for bleed, trim and safety. Below is a full guide to correctly prepare your print-ready file. 1. Start with the correct final sizeFrom the start, define the exact size of the final product. Avoid designing in a different size and adjusting it later. This ensures all elements remain proportional and well positioned, avoiding errors at export or printing stage. 2. Use bleed and safety margins
3. Balance visual hierarchyDistribute page elements well: maintain good proportion between text, images, and white space. Make sure the content is clear, well-organised and visually harmonious. Overcrowded designs can confuse or impair reading. 4. Choose legible and proportional fonts
5. Use images with adequate resolution
6. Proofread all text before exporting
7. Define a consistent visual styleChoose a colour palette, typography and graphic style consistent with your brand or product purpose. A consistent design communicates professionalism and clarity. 8. Use the supplied design templateWhen using templates from the platform or the free Ask-to-Print Online Editor, place elements according to the guide lines. These lines indicate bleed, trim, fold and safety zones. You can also start your project from scratch in the editor and ensure proper element positioning. 9. Be careful with free online editorsSome online PDF editors don't correctly embed fonts, which can lead to font replacements or display issues. When possible, export the PDF with full font embedding and validate using a professional PDF viewer. 10. Use proper tools to create your designTo properly prepare your file, use the Ask-to-Print Online Editor or professional graphic software that supports technical margin setup and professional formats. Common professional solutions include Adobe Illustrator, InDesign, Photoshop and CorelDRAW. These programs offer full control over vectors, fonts, bleeds and layers — ideal for advanced graphic production. For free options, consider Canva (Pro version recommended for export), Inkscape (vector-based) and GIMP (image editing). While less robust, these tools can deliver quality files when used within printing specs. 11. Export correctly to PDF for printOnce your design is finished, export the file as PDF, following these essential requirements to ensure quality and print compatibility:
For step-by-step guides on how to export correctly in each program, see our PDF print export FAQ. Na Ask-to-Print, a verificação do ficheiro depende da opção selecionada no momento da encomenda. Pode escolher entre três níveis de validação, consoante o tipo de apoio que pretende antes de avançar para impressão. Não Verificar FicheiroAo selecionar esta opção, confirma que o ficheiro enviado está correto, finalizado e pronto para impressão. Neste caso, o ficheiro segue diretamente para produção, sem qualquer verificação técnica prévia. Esta opção não tem custos adicionais. Verificar FicheiroAo selecionar esta opção, o seu ficheiro será analisado por um profissional antes de seguir para impressão. Se forem identificados erros ou inconformidades, será contactado antes de avançarmos com a produção. Esta opção tem um custo associado. Verificar e CorrigirAo selecionar esta opção, o seu ficheiro será analisado por um profissional antes da impressão. Se forem detetados erros ou inconformidades passíveis de correção técnica, estes serão ajustados antes de o ficheiro seguir para produção. Esta opção tem um custo associado. Que tipos de erros podem ser verificados?A verificação pode abranger, entre outros aspetos técnicos, situações como:
A análise incide sobretudo sobre a preparação técnica do ficheiro para impressão. Sempre que necessário, e de acordo com a opção escolhida, o cliente será informado ou o ficheiro será corrigido antes da produção. Importa ainda referir que o serviço de correção não deve ser entendido como um serviço de design gráfico, reformulação criativa ou reconstrução de elementos da arte-final. At Ask-to-Print, we accept various file formats to ensure the best customization and production experience. However, not all formats offer the same features in the design checking and adjustment process. See below for file type details: Files with Preview and Editable Options (recommended and preferred)
Files with Preview, No Editing Options
Accepted Files, No Preview or Editing Options
Files Not Accepted by the Platform
Still have questions? When preparing a file for printing, it's essential to understand the difference between the two main colour models used in graphic design: CMYK and RGB. Although both allow for attractive visuals, they serve different purposes and produce different results — especially in print processes. What are CMYK and RGB colours, and which should I use for printing?CMYK – The colour model for printingCMYK stands for Cyan, Magenta, Yellow, and Black. It is the colour model used in all professional printing processes. Colours are created by overlaying percentages of these four inks in layers on the printed surface.
RGB – Colour model for screensRGB stands for Red, Green, and Blue. It’s a light-emitting colour model used for displaying colours on digital screens such as monitors, tablets, or smartphones. This model can produce much more vibrant and saturated colours than CMYK.
What is colour gamut?The gamut is the range of colours that a given colour model or device can reproduce. The RGB model has a wider gamut than CMYK, meaning it can display colours that simply cannot be printed with standard inks. When a file created in RGB is automatically converted to CMYK, colours outside the CMYK gamut are adjusted to approximate values. This can result in noticeable visual differences between what is seen on screen and what gets printed — especially with certain RGB-exclusive or highly vibrant tones. Which should I use when preparing files for print?You should always work in CMYK colour mode when creating files intended for print. This ensures that what you see during design stays closer to what can realistically be printed. If you're using design programs such as Adobe Illustrator, InDesign, or Photoshop, set the colour space to CMYK from the start. On Canva, choose CMYK export (available on the Pro version). This practice prevents colour fidelity loss. On the Ask-to-Print Online Editor, there’s no need to worry: all files are automatically generated in CMYK with optimised colour management. Useful tip for professionals and beginnersEven when working in CMYK, differences between screen and print may persist. We recommend using a physical CMYK colour guide to visualise true tonal values before finalising your design. This is especially helpful for branding or colour-critical materials. Yes. The PDF/X-1a format is accepted by Ask-to-Print and is one of the most recommended options for finalised files. This format ensures that your design is reproduced accurately, preserving embedded fonts, CMYK colours and removing transparencies that may cause printing issues. If your file is production-ready, PDF/X-1a is an excellent choice. Does Ask-to-Print recommend the PDF/X-1a format?We strongly recommend using PDF/X-1a whenever uploading a finalised file, especially for technically demanding products such as business cards, flyers or catalogues. This format offers greater compatibility with our production systems and reduces the chance of errors related to fonts, colours or bleed margins. When should I use the PDF/X-1a format?PDF/X-1a is ideal for files that require no further editing and are ready for print. If you created your design in software like Adobe Illustrator, InDesign or CorelDRAW and want to preserve the exact layout, this is the safest format. It's especially useful for designs with pure CMYK colours, high-resolution images and where final alignment is crucial. Does PDF/X-1a guarantee better print quality?More than quality, PDF/X-1a guarantees consistency and reliability. It prevents issues like font substitution, incorrect colour profiles or unhandled transparencies. The visual quality also depends on resolution and layout, but this format ensures what you see on screen is what gets printed — no surprises. How can I generate a PDF/X-1a file?You can generate a PDF/X-1a from programs like Adobe Illustrator, InDesign, Photoshop or CorelDRAW. Just select “Save as PDF” and choose the PDF/X-1a:2001 preset. Make sure to use CMYK colour mode, include 3 mm bleed and convert text to outlines. You can also download our pre-configured templates to simplify the process. What are the advantages of sending a file in PDF/X-1a?Better print safety; Preserves fonts, images and colours; Reduces technical error risks; Compatible with prepress systems; Prevents layout surprises. By choosing this format, you're ensuring your file meets best practices in the graphic arts industry. At Ask-to-Print, you can request a custom cut for various types of products. This cut refers to a shape that differs from the traditional rectangular or square format — such as special contours, curves, interior cutouts or decorative forms. In the graphic industry, the term custom cut is often referred to as a “die cut” or “cutting line”, and applies both to the traditional blade-based process and to digital cutting (laser or cutting table), which is commonly used for large formats. How to create a file with a custom cutIf your order includes a custom cut, please prepare your file as follows:
Important technical rules
Bleed and cutting lineTo ensure a flawless result and avoid unwanted white edges, the cutting path should slightly overlap the image. Therefore, we recommend applying a minimum bleed of 3 mm for small formats and 5 mm for large formats around the cut area. This ensures the background or image extends beyond the cut line, providing a continuous and clean finish. Recommended softwareTo properly prepare the custom cut, use vector illustration software such as Adobe Illustrator, CorelDRAW, InkScape, or other tools compatible with layers and spot colors. Need help?If you have any questions or need assistance, our team is always available to help. To check our contact details, click here. Yes, you can view a proof before printing. If you choose to upload your design or final artwork, you will also be able to preview the job before production — as long as the file is in one of the following formats compatible with digital proofing:
We accept many other formats, but only these allow automatic job preview generation. The certifications FSC® (Forest Stewardship Council®) and PEFC® (Programme for the Endorsement of Forest Certification) ensure that the paper used comes from responsibly and sustainably managed forests.
Both labels demonstrate a commitment to sustainability and help consumers make more conscious and responsible choices. Production FilesA low-resolution file may result in pixelation, lack of sharpness, irregular edges and loss of detail in the final product. Resolution should always be assessed at the actual production size. Artificially enlarging a small image does not restore the original detail and may further reduce image quality. Whenever possible, use high-resolution images or vector graphics. Take particular care with images downloaded from the Internet, as they are often optimised for screens and may not have sufficient resolution for graphic production. When creating a design using very specific fonts or fonts that may not be available in our system, those fonts may be automatically replaced with standard fonts, which can significantly alter the appearance of your printed material. How does this happen?If the font used in your design is not embedded in the file or is not a common font recognized by our system, the print software will attempt to replace it with a similar one. However, this substitution may cause your design to lose its original appearance, affecting spacing, formatting and layout. How to avoid this issue?To ensure your design prints exactly as intended, follow these steps:
SummaryTo avoid font issues and ensure your design prints exactly as intended, embed fonts or convert them to outlines. Final Artwork – Paper PrintingTo ensure your file is ready for printing with special and highlight graphic finishes, it is essential to correctly prepare all embellishment elements. This procedure applies to any product involving one or more of the following finishes:
These effects can be combined with special cutting (CutContour). Therefore, each finish must be placed on a separate layer, with a properly assigned technical colour (Spot Colour) and the Overprint attribute always activated. 1. Use only vector elementsAll special finish elements must be vector-based (not rasterized) to ensure accuracy and quality. Avoid using images or pixelated effects. 2. Create a separate layer for each finish typeEach finish must be placed on a distinct layer, with a specific technical name and dedicated Spot Colour application (see below). 3. Draw clean and closed pathsAvoid overlapping shapes, sharp angles or open paths. Use tools like Pathfinder (Illustrator) to unite, intersect or combine elements — ensuring simple and precise outlines. 4. Layer names and colours for finishesAccording to the type of finish, you should create a specific layer with the correct technical name and apply a Spot Colour with the values defined below. All elements must have the Overprint attribute activated.
Attention: In cases where finishes are combined. If stamped embossing is required, you must create two separate layers with the respective configurations described above:
Additional note: If your product includes a customised special die cut, you must also set up an additional layer with the corresponding path:
5. Activate overprintAll finish paths must have Overprint activated. This ensures the finish will be printed over the artwork without interference or failures. 6. Organise the layers correctly
7. Important technical care for special finishes
8. Layer alignmentIf the finish (varnish, foil or embossing) must align exactly with artwork elements, ensure that elements in the Artwork, Finishing,Emboss and CutContour layers are perfectly aligned. 9. Recommended toolsTo correctly prepare your file, use vector illustration software such as Adobe Illustrator, CorelDRAW or InkScape, or other tools compatible with layers and spot colours. Need help?If you have any questions or need support, our team is always available to help you. To check our contacts click here.  Payment methods     |