


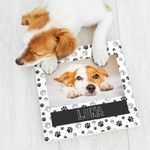
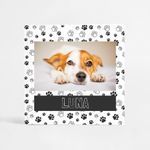



Pet photo album to cherish every moment
Turn unique moments into photos with professional quality
An album dedicated to your four-legged companions, ideal for capturing unforgettable moments. With high-definition photo printing, each page comes to life with vivid colors and sharp details. Produced with Fujifilm Crystal Archive DP II papers, it ensures quality and durability, while the Layflat binding allows for continuous, uninterrupted viewing.
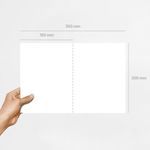
- Various sizes and formats to choose from
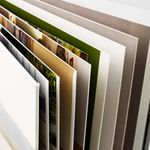
- 3 photo paper options: Glossy, Matte and Silk
- Hardcover and flexible cover, adapted to your style
- Classic finishes or linen, leather or wood
- Layflat binding for a completely flat opening
Pet Photo Album (Themed Albums)
Share
Registe os momentos especiais do seu animal
O álbum de fotos de animais foi criado para transformar momentos em memórias duradouras. Seja uma brincadeira divertida ou um olhar cúmplice, cada fotografia ganha destaque neste álbum pensado para amantes de animais, ideal para cães, gatos ou outros companheiros especiais.
Materiais premium para guardar memórias
Produzido em papéis Fujifilm Crystal Archive DP II, este álbum assegura cores vibrantes, alta nitidez e resistência ao tempo. A encadernação Layflat permite abrir o álbum totalmente plano, valorizando cada imagem. A capa pode ser dura ou flexível, com revestimentos elegantes em linho, pele ou madeira, para garantir sofisticação e durabilidade.
Personalize o Álbum de Fotos de Animais com o Editor Online da Ask-to-Print
Com o nosso Editor Online, pode criar facilmente um álbum único e cheio de personalidade. Adicione fotos, frases e organize os layouts como desejar. Descubra templates criativos e transforme as memórias dos seus animais num livro fotográfico exclusivo.
Compre o Álbum de Fotos de Animais com Qualidade e Preço Acessível
Este produto é uma opção económica que alia qualidade e emoção. Disponível em versão barato e também como solução low-cost, é ideal para quem procura preservar recordações sem comprometer o orçamento. Compre já e transforme a ligação com o seu animal em páginas inesquecíveis.
Fujifilm Crystal Archive DP II Photo Paper
High-quality photo paper
Fujifilm Crystal Archive DP II photo papers are globally recognized for their premium quality, durability, and professional finish. Designed with silver halide technology, they deliver vivid colors, sharp details, and long-lasting resistance, making them the ideal choice for photo albums, large-format prints, and prestigious projects. With Glossy, Matte, and Satin (Silk) finishes, they ensure the perfect solution for every style and preference, always maintaining the excellence of the Fujifilm brand.
High Gloss Photo Paper
Photo Paper | Fujifilm Crystal Archive DP II Professional Glossy |
| Finish | High Gloss |
| Weight | 250 g/m² |
| Thickness | 0.23 mm |
| Writing | Permanent marker |
| Fingerprints | Fingerprints may be visible |
| Production technology | Silver halide |
| Copy protection | — |
| FSC® Certified | Yes |
Semi-Matte Photo Paper
Photo Paper | Fujifilm Crystal Archive DP II Professional Matte |
| Finish | Semi-matte |
| Weight | 234 g/m² |
| Thickness | 0.22 mm |
| Writing | Permanent marker |
| Fingerprints | Fingerprints hardly visible |
| Production technology | Silver halide |
| Copy protection | — |
| FSC® Certified | Yes |
Satin Photo Paper (Silk)
Photo Paper | Fujifilm Crystal Archive DP II Professional Satin (Silk) |
| Finish | Satin (SILK) with honeycomb texture |
| Weight | 232 g/m² |
| Thickness | 0.23 mm |
| Writing | Permanent marker, ballpoint pen |
| Fingerprints | Fingerprints not visible |
| Production technology | Silver halide |
| Copy protection | Structured surface prevents photo copying |
| FSC® Certified | Yes |
FAQs
Printing and Production
Na Ask-to-Print, a verificação do ficheiro depende da opção selecionada no momento da encomenda. Pode escolher entre três níveis de validação, consoante o tipo de apoio que pretende antes de avançar para impressão.
Não Verificar Ficheiro
Ao selecionar esta opção, confirma que o ficheiro enviado está correto, finalizado e pronto para impressão. Neste caso, o ficheiro segue diretamente para produção, sem qualquer verificação técnica prévia. Esta opção não tem custos adicionais.
Verificar Ficheiro
Ao selecionar esta opção, o seu ficheiro será analisado por um profissional antes de seguir para impressão. Se forem identificados erros ou inconformidades, será contactado antes de avançarmos com a produção. Esta opção tem um custo associado.
Verificar e Corrigir
Ao selecionar esta opção, o seu ficheiro será analisado por um profissional antes da impressão. Se forem detetados erros ou inconformidades passíveis de correção técnica, estes serão ajustados antes de o ficheiro seguir para produção. Esta opção tem um custo associado.
Que tipos de erros podem ser verificados?
A verificação pode abranger, entre outros aspetos técnicos, situações como:
- resolução insuficiente de imagens;
- dimensões incorretas do ficheiro;
- ausência de margens de segurança;
- falta de sangramento, bleed ou margem de corte;
- textos ou elementos demasiado próximos da linha de corte;
- utilização de modo de cor incorreto;
- fontes não convertidas em contornos ou não incorporadas;
- elementos em falta ou mal posicionados;
- páginas trocadas ou orientação incorreta;
- linhas de corte, marcas ou outros elementos técnicos indevidos na arte-final.
A análise incide sobretudo sobre a preparação técnica do ficheiro para impressão. Sempre que necessário, e de acordo com a opção escolhida, o cliente será informado ou o ficheiro será corrigido antes da produção.
Importa ainda referir que o serviço de correção não deve ser entendido como um serviço de design gráfico, reformulação criativa ou reconstrução de elementos da arte-final.
At Ask-to-Print, we accept various file formats to ensure the best customization and production experience. However, not all formats offer the same features in the design checking and adjustment process.
See below for file type details:
Files with Preview and Editable Options (recommended and preferred)
- .pdf (Adobe Acrobat)
- .png (PNG Image)
- .jpeg / .jpg (JPEG Image)
- .tiff (TIFF Image)
- .svg (Vector Graphic)
Files with Preview, No Editing Options
- .ai (Adobe Illustrator)
- .eps (PostScript)
- .gif (GIF Image)
Accepted Files, No Preview or Editing Options
- .psd (Adobe Photoshop)
- .cdr (CorelDRAW)
Files Not Accepted by the Platform
- .ppt (Microsoft PowerPoint)
- .doc (Microsoft Word)
- .bmp (Bitmap Image)
Still have questions?
If you're unsure about the correct format or are having trouble uploading your file, our Customer Support team is here to help. Don’t hesitate to contact us — we’ll be happy to assist and ensure your order runs smoothly.
To contact us click here!
When preparing a file for printing, it's essential to understand the difference between the two main colour models used in graphic design: CMYK and RGB. Although both allow for attractive visuals, they serve different purposes and produce different results — especially in print processes.
What are CMYK and RGB colours, and which should I use for printing?
CMYK – The colour model for printing
CMYK stands for Cyan, Magenta, Yellow, and Black. It is the colour model used in all professional printing processes. Colours are created by overlaying percentages of these four inks in layers on the printed surface.
- Used in offset and digital printing.
- Based on subtractive colour from reflected light — unlike screen-emitted light.
- Reproduces a more limited colour gamut, but one suited to the physical printing process.
RGB – Colour model for screens
RGB stands for Red, Green, and Blue. It’s a light-emitting colour model used for displaying colours on digital screens such as monitors, tablets, or smartphones. This model can produce much more vibrant and saturated colours than CMYK.
- Ideal for digital images, videos, and websites.
- Offers a wider colour gamut — meaning it covers more possible colours.
- Colours may appear more intense on screen than what can be printed.
What is colour gamut?
The gamut is the range of colours that a given colour model or device can reproduce. The RGB model has a wider gamut than CMYK, meaning it can display colours that simply cannot be printed with standard inks.
When a file created in RGB is automatically converted to CMYK, colours outside the CMYK gamut are adjusted to approximate values. This can result in noticeable visual differences between what is seen on screen and what gets printed — especially with certain RGB-exclusive or highly vibrant tones.
Which should I use when preparing files for print?
You should always work in CMYK colour mode when creating files intended for print. This ensures that what you see during design stays closer to what can realistically be printed.
If you're using design programs such as Adobe Illustrator, InDesign, or Photoshop, set the colour space to CMYK from the start. On Canva, choose CMYK export (available on the Pro version). This practice prevents colour fidelity loss.
On the Ask-to-Print Online Editor, there’s no need to worry: all files are automatically generated in CMYK with optimised colour management.
Useful tip for professionals and beginners
Even when working in CMYK, differences between screen and print may persist. We recommend using a physical CMYK colour guide to visualise true tonal values before finalising your design. This is especially helpful for branding or colour-critical materials.
Yes. The PDF/X-1a format is accepted by Ask-to-Print and is one of the most recommended options for finalised files. This format ensures that your design is reproduced accurately, preserving embedded fonts, CMYK colours and removing transparencies that may cause printing issues. If your file is production-ready, PDF/X-1a is an excellent choice.
Does Ask-to-Print recommend the PDF/X-1a format?
We strongly recommend using PDF/X-1a whenever uploading a finalised file, especially for technically demanding products such as business cards, flyers or catalogues. This format offers greater compatibility with our production systems and reduces the chance of errors related to fonts, colours or bleed margins.
When should I use the PDF/X-1a format?
PDF/X-1a is ideal for files that require no further editing and are ready for print. If you created your design in software like Adobe Illustrator, InDesign or CorelDRAW and want to preserve the exact layout, this is the safest format. It's especially useful for designs with pure CMYK colours, high-resolution images and where final alignment is crucial.
Does PDF/X-1a guarantee better print quality?
More than quality, PDF/X-1a guarantees consistency and reliability. It prevents issues like font substitution, incorrect colour profiles or unhandled transparencies. The visual quality also depends on resolution and layout, but this format ensures what you see on screen is what gets printed — no surprises.
How can I generate a PDF/X-1a file?
You can generate a PDF/X-1a from programs like Adobe Illustrator, InDesign, Photoshop or CorelDRAW. Just select “Save as PDF” and choose the PDF/X-1a:2001 preset. Make sure to use CMYK colour mode, include 3 mm bleed and convert text to outlines. You can also download our pre-configured templates to simplify the process.
What are the advantages of sending a file in PDF/X-1a?
Better print safety; Preserves fonts, images and colours; Reduces technical error risks; Compatible with prepress systems; Prevents layout surprises. By choosing this format, you're ensuring your file meets best practices in the graphic arts industry.
Yes, you can view a proof before printing.
If you use our online editor, you’ll get instant access to a real-time preview of your design, accurately simulating the final result.
If you choose to upload your design or final artwork, you will also be able to preview the job before production — as long as the file is in one of the following formats compatible with digital proofing:
- PDF: Standard format for design previews.
- JPEG and JPG: Image format
- PNG
- GIF: Supported in the proofing process, allowing visual validation before printing.
- Tiff
- AI
- SVG
We accept many other formats, but only these allow automatic job preview generation.
Production Files
A low-resolution file may result in pixelation, lack of sharpness, irregular edges and loss of detail in the final product.
Resolution should always be assessed at the actual production size. Artificially enlarging a small image does not restore the original detail and may further reduce image quality.
Whenever possible, use high-resolution images or vector graphics. Take particular care with images downloaded from the Internet, as they are often optimised for screens and may not have sufficient resolution for graphic production.
When creating a design using very specific fonts or fonts that may not be available in our system, those fonts may be automatically replaced with standard fonts, which can significantly alter the appearance of your printed material.
How does this happen?
If the font used in your design is not embedded in the file or is not a common font recognized by our system, the print software will attempt to replace it with a similar one. However, this substitution may cause your design to lose its original appearance, affecting spacing, formatting and layout.
How to avoid this issue?
To ensure your design prints exactly as intended, follow these steps:
- Embed fonts in the final file: Make sure all fonts used in your project are properly embedded in the design file. This can be done when exporting the file from your design software (such as Illustrator, InDesign, Corel Draw, or others).
- Convert text to outlines: If you can’t embed the fonts, an alternative is to convert the text to outlines (or paths). This transforms the text into vector shapes, eliminating the need for external fonts. Note: This option is not recommended for products like Books, Magazines or Catalogues, as outlined text cannot be edited later.
- Check fonts and images in your file: Graphic design software such as Illustrator offers tools to ensure everything is correct before sending your file to print. One way to do this is to generate a final report that lists all fonts used and includes details about images, such as whether they are in CMYK or RGB mode (remember that for printing, images must be in CMYK).
- To generate the report in Illustrator:
- Go to the “File” menu >“Package”.
- In the Package options panel, check the boxes to include fonts and images.
- Illustrator will create a folder with all your project files, including embedded fonts, images (with CMYK or RGB info), and other essential details.
- To generate the report in Illustrator:
- Use the Illustrator Package feature: This is ideal to ensure that all resources required for your project are properly delivered. The Package generates a folder containing all design elements (fonts, images, colours, and more), making it easier to review everything.
Summary
To avoid font issues and ensure your design prints exactly as intended, embed fonts or convert them to outlines.
Embedding fonts in a PDF is essential to ensure the file is viewed and printed correctly on devices that may not have the same fonts installed. This practice is especially important in web-to-print environments, where files are prepared by end users and sent directly to print production.
What does embedding fonts mean?
When you embed fonts in a PDF file, the font data is included directly within the document. This preserves the text’s appearance, even if the PDF is opened on different computers, using different systems or without the original fonts installed.
How to embed fonts – General Steps
Adobe InDesign, Illustrator and Photoshop
- Go to File > Export and choose the Adobe PDF format.
- Access the Advanced tab.
- Enable the option Embed All Fonts or Subset fonts below 100%.
- Select a profile like PDF/X-1a or PDF/X-4, suitable for professional printing.
CorelDRAW
- Go to File > Export > PDF.
- In the Advanced tab, select Embed All Fonts.
Other programs (Affinity Designer, Canva, Inkscape, GIMP, etc.)
- Most export to PDF with fonts embedded by default.
- Always check export options for terms like "embed fonts" or "PDF/X compliance".
Best Practices for Web-to-Print
- Converting text to outlines is a safe option if the file doesn’t need further editing.
- Only use licensed fonts to avoid embedding restrictions.
- Avoid online fonts from cloud editors that don’t allow embedding.
What is rich black and when should it be used?
In graphic design for print, there are two main ways to apply black: plain black (100% K) and rich black. While both may look the same on screen, the printed result can differ significantly depending on the method used.
Plain black (100% K)
Plain black uses only black ink (K = 100%) in the CMYK model. It is ideal for text and fine elements, ensuring clarity, readability and no registration issues. However, when used in large solid areas (e.g., backgrounds), it may appear dull or greyish, as it relies on a single layer of ink.
Rich black – Greater intensity and depth
Rich black is created by combining black ink with controlled amounts of cyan, magenta and yellow (CMY). This blend enhances visual density and results in a deeper, more even black. It is especially effective for dark backgrounds, large blocks or visually impactful elements.
A safe and commonly used rich black formula is:
- C: 60%
- M: 40%
- Y: 40%
- K: 100%
These percentages may vary slightly depending on the paper type and print profile, but total ink coverage must always be respected.
Best practices when using rich black
- Use plain black (100% K) for text, fine lines and small elements — avoids registration issues.
- Use rich black for large areas, dark backgrounds or impactful visuals.
- Avoid using 100% for all colours (C+M+Y+K), as it may cause ink overload and drying issues — use our recommended formula instead.


